Sunday, May 20, 2012

Insert Joel and Ethan Coen Reference Here

So in today's paper there's an Office Depot ad for a Brother HL 2240 Monochrome Laser Printer for $69.95. We really need a BW printer, and Laser is obviously the way to go to keep the price per page down. The thing got decent user reviews on Amazon, as long as you remember:

  • It's Cheap.
  • It's USB.
  • You have to replace the drum at 14,000 pages (like we'll get to that any time soon).
  • The initial cartridge only lasts for 700 pages (though you can apparently fool the printer into printing more)
  • It's cheap.

So I went out and bought the thing — the closest thing to an impulse electronics buy since I got that $20 Canon Printer/Scanner when I was at Duke. (The scanner still works, the paper feed mechanism for the printer is broken.)

I read all of the installation instructions, plugged the thing in, printed the test page, got the USB cable from the $20 printer and used it to connect the printer with Hal, and turned on the printer. Ubuntu's auto print installer came up, recognized the printer, and …

Wouldn't you know it, CUPS doesn't have a driver for the Brother HL2240. (Obviously I didn't do a lot of research.)

No problem, Brother provides proprietary drivers for the printer. (Forgive me, St. Richard.)

It's not a difficult process. Go to Brother site, and download the .deb packages for the HL-2240:
LPR Driver (hl2240lpr-2.1.0-1.i386.deb) and
CUPS wrapper drive (cupswrapperHL2240-2.0.4-2.i386.deb).

Install both drivers, in order:

sudo dpkg -i --force-all hl2240lpr-2.1.0-1.i386.deb
sudo dpkg -i --force-all cupswrapperHL2240-2.0.4-2.i386.deb

At some point during this you'll get a message that the Brother printer has been found, and if you click on System Settings (under your name in the upper right of your screen), followed by Printers, and then Brother HL2240, you'll be able to print out the test page.

It works fine. Except …

I also want to be able to access the printer from Harlie, the machine upstairs. I previously alluded to doing this before (see rants, uh, points, 35 and 36), but that was with native CUPS drivers. I'll provide a bit more detail this time. Remember that the printer is installed on Hal, and we want Harlie to be able to use it.

So on Hal:

  • Open up a browser and go to http://localhost:631/.
  • Click on the Administration tab.
  • Under Server on the right, click the box that says Share printers connected to this system, and then click Change Settings.

Go upstairs to Harlie:

  • Install those same Brother Printer Drivers. You'll get some message about a printer being found. Ignore it.
  • Open up a browser and go to http://localhost:631/.
  • Click on Administration and Add Printer.
  • You should see a box which says something like
    Brother HL2240 BW Laser @ harlie (Brother HL2240 series)
    Click its radio button and then click Continue.
  • Fill in the information you want to use to identify the printer. Click Share this printer if you want others to be able to use it from Harlie. Again click Continue.
  • Now for the trick. The next screen will ask you for the location of the CUPS driver. It won't be in the list, since it's proprietary, but after a bit of searching, I found it. Where it says Or Provide PPD File: click Choose File, and search until you find the file
    /usr/share/ppd/HL2240.ppd
    Choose this, then Add Printer.
  • If the Force is With You, your printer will now be installed.

Note that you can use CUPS to change the behavior of your printer. For example, if you go to Administration, click on Manage Printers, and click the name of your printer, you'll see a page that has two pull-down boxes, one labeled Maintenance and the other Administration. Click on the Admin box and you'll see a bunch of things you can do. In particular, under Set Default Options you can choose your paper size, print resolution, ink toner usage, etc.

Saturday, May 19, 2012

Finding Files Born After a Given Date

A few weeks ago Friend TK came up with a question:

RC, how can I find all of the pictures I put on my computer since Christmas without seeing all of the pictures in the .cache directories and other junk places?

An interesting question, indeed. We want to search for files that are newer than a certain target date, and they'll probably have extensions like .jpg or .png, though there will be the occasional file with an extension .jpeg or even .JPEG. It obviously requires some form of the Unix find command, but it's not exactly obvious what that would be. TK and I hunted around on the web a bit and finally came up with this:


touch -d 20111225 tokenfile
find . -type f \( -iname "*jpg" -o -iname "*jpeg" \) -anewer tokenfile  -print | egrep -v ".cache/|.thumbnails|.kde/"

which creates a marker, tokenfile, which looks to have been born last Christmas Day, and finds all files newer than that and ending in jpg or (the -o) jpeg without regard to case (that's the -iname). We then pipe the file through egrep, striping off (-v) files who have names matching directories we don't want to see (the | is the grep equivalent of find's -o.

This is not entirely elegant. I was pretty sure I could make this into a purely find one-liner, leaving no trace behind (such as that tokenfile we created up there. To do this I knew I'd have to delve deeper into findology than I had in my 30 or so years of Unix use. If found some of the clues at Linux.ie's finder-keepers page, and other hints elsewhere. Eventually this let me put together this one-line script:


find . -type d \( -iname .\[a-z\]\* -o -iname work \) -prune -o -newermt 2011225 \( -iname "*j*g" -o -iname "*png" \) -print

Let's look at this in some detail, since it contains some things that I hadn't known:

  • find, of course, is the Unix/Linux command for looking through your file system.
  • . is the current directory. Find uses it as the starting directory. find will look at every file in this directory, its sub-directories, and all their children and grandchildren, to the umpteenth generation. If you only wanted to search where you thought pictures might be, you could instead write
    find $HOME/Pictures
  • -type d says that the next set of files will describe directories, rather than files (which would be -type f).
  • The \( and \) delineate what will be a list of file descriptors. The backslashes make sure that the parenthesis are passed to find, and not gobbled up by the shell. Sometimes you can use quotations marks within find, instead of parenthesis, but this isn't one of those times.
  • Now for the heart of the matter: -iname .\[a-z\]\* tells find to look for directory names that start with a . followed by a letter ([a-z]), and then by anything else (*). Again the backslashes are there to make sure the next characters are passed to the find command. Note that this gets rid of every hidden directory in you file tree.
  • As before, -o is the or command. The -iname work command identifies my work directory, which may have pictures in it but nothing I'm interested in at the present time. You can add further -o -iname commands as needed.
  • -prune tells find to look at every file except those in the directories just named. This serves the purpose of the egrep -v command in our initial attempt.
  • You know, I'm not sure why the -o follows -prune. You'd think it would be some kind of and command, but just dropping it doesn't work.
  • -newermt 20111225 is one of the newer options in find. This one says to look at all files modified (m) after a certain time (t). The time here is a date, written in the format yyyymmdd, in this case last Christmas. If we wanted files written after noon on Christmas, we'd use -newermt "20111225 1200".
  • Again we have a list of -inames, delineated by backslash-parenthesis. These are file names you want to look for. Note that j*g catches all files ending in jpg, jpeg, JPG, or JPEG. It also catches files in .jynormouslyinteresting, but you can't have everything.
  • Finally, -print lists all the files. You can actually drop this, as find takes -print as its default action.

And that's it. OK, not quite. What TK wanted was to copy all of the files he found to a new directory, we'll call it recent, so he could examine them in detail. To do that we use the -exec option of find:


find . -type d \( -iname .\[a-z\]\* -o -name work -o -name recent \) -prune -o -newermt 20111225 \( -iname "*j*g" -o -iname "*png" \) -exec cp -p {} ~/recent ';'

  • Note that we've added the recent directory to our list of avoided directories. Otherwise find will search recent, and give errors.
  • -exec tells find to execute the following file command.
  • cp -r is the usual copy command, with -r saying to preserve the original timestamps on the copied files. If you wanted to save space, and weren't going to modify the pictures, you could link with either ln or ln -s instead.
  • {} is where find places its output. That is, if there is a file Pictures/cutekids.jpg, find issues the command
    cp -r Pictures/cutekids.jpg recent
  • ; tells find that we're done.

Saturday, April 14, 2012

A Linux Preview Script

Mac OS X comes with a program called Preview, which displays PDF files as well as images (PNG, GIF, Bitmap, etc.). Linux doesn't have anything quite like it. OK, if you use the Gnome desktop there's something called Document Viewer, usually linked to evince, which reads Postscript, PDF, Djvu, DVI, etc. In fact, it displays Documents better than Preview does.

Unfortunately, evince doesn't display images. For that we have programs like Eye of Gnome, qiv (my favorite), and for image manipulation ImageMagick or the GIMP.

And then there are plain old ASCII files, such as you'd use for source code or LaTeX. For that we could use The One True Editor, or gedit, or some other sort of pop-up display window that lists the contents of a file.

What we want, then, is a program, preferably a command line script, which is given a file name, determines what the file is, and then opens the file using the appropriate viewer/editor. How do we do that, pray tell?

Enter the file command, inherited from Unix. file is pretty useful. For example, suppose I have a JPEG file, but for some reason it has been named x1, without the extension. file figures it out pretty fast:


$ file x1
x1: JPEG image data, JFIF standard 1.02

And it will work on most standard Linux file types.

Given this, it's fairly easy to construct a script which takes a look at one or more files, determines the file type, and picks out the approriate file viewer. My script is below. I've called it gnuview. You invoke it from the command line:


$ gnuview file1.txt file2.png file3.dvi file4.bmp

and all of these files pop up on your screen, each launched using the appropriate program.

A few notes:

  • The list of file types is not by any means complete, though I think I hit most of the major ones. If the script doesn't know how to handle a specific file type, it prints out a message on standard error. It's fairly obvious how to add different file types.
  • I dumped my favorite programs (qiv and emacs), in favor of programs that are installed by default with most Linux distributions (eye of gnome, gedit). (qiv doesn't read bitmap files, anyway.) Feel free to change the defaults to your favorite.
  • Error messages? We don't need no stinkin' error messages!
  • Finally, the cascading tree structure of if statements is just annoying. This should probably be rewritten using some kind of case construction, but I didn't bother to figure it out.

No warranty for any of this, of course, and not even a license except for the Creative Commons Disclaimer down at the bottom of this web page. If you come up with a version of this code, put it in the comments or put a link to it there.


#! /bin/bash

# This is an attempt to mimic the behavior of Apple's OS X Preview
#  program.  We determine the type of the file and then use the
#  appropriate command to open it.

# Some defaults.  Change as you see fit:

# ASCII files.  Note that gedit must be invoked in standalone mode

GNTXT="/usr/bin/gedit -s"

# Picture viewer (eog reads more files than qiv, so we'll use that)

GNPIC=/usr/bin/eog

# Postscript/PDF/DjVu/DVI viewer:

GNPDF=/usr/bin/evince

# Read the command line, and scroll through each file type:

for thisfile
do

#   If the string says ASCII anywhere, do this, which should get
#     LaTeX source, source code, etc.

    file $thisfile | grep 'ASCII' 2>&1 > /dev/null
    if [ $? -eq 0 ]
    then

        $GNTXT $thisfile &

    else

#   Maybe it's a document (Postscript/PDF/DjVu/DVI):
#   (I wan't sure about the "or" construct, see the first comment in
#   http://www.cyberciti.biz/faq/searching-multiple-words-string-using-grep/)
        file $thisfile | grep 'document\|DVI' 2>&1 > /dev/null
        if [ $? -eq 0 ]
        then
            $GNPDF $thisfile &
        else

#   Or maybe it's an image
            file $thisfile | grep 'image\|bitmap' 2>&1 > /dev/null
            if [ $? -eq 0 ]
            then
                $GNPIC $thisfile &
            else

#               And if we haven't figured out the type yet,
#                leave a nice note:
                FTYPE=`file $thisfile | awk '{print $2}'`
                echo Cannot handle file $thisfile, type $FTYPE  > /dev/stderr
            fi
        fi
    fi

done


Sunday, March 25, 2012

Roy Williams after Kansas game

Hoping we never have to play Illinois.

Poster format courtesy of Motivator

Saturday, February 18, 2012

Cleanup Time

I promised my wife that I'd spend most of this long weekend cleaning up the office. It's been a while since I got my desk cleaned off, not to mention the various piles of clutter hiding in various corners.

I'm about halfway finished. It's been interesting. So far I've found:

  • A $200 Series I savings bond — from 2007. I think I'll keep that.
  • Family Circus Our House, a CD with what seems to be a game that lets you make like Billy and explore the house and neighborhood. For MS-DOS, at least it tells you to type D:\setup.exe on the command line. Takes up 3 MB of space. Never played. I think I'll send it to Stephan Pastis.
  • Manual for lawnmower purchased in 1996 and broken down by 1998.
  • About 50 blank 3-1/2 inch floppy disks. You want 'em, come get 'em.
  • A Gateway 2000 System CD, from my very first Intel computer — I started with an Apple //e (see below).
  • A copy of Microsoft Flight Simulator. Keeping that, I think it still plays either with Wine or Windows under VirtualBox.
  • A wide variety of cheap CD encyclopedias, all dating from before Wikipedia, and even before that great and wonderful time when the Encyclopedia Britannica was online in its entirety, and free.
  • The very first CD version of Halliday and Resnick's Fundamentals of Physics. I got it in return for writing a review for GEnie. It should be in my collection of reviews, but darned if I can find it.
  • Zip Disks. Sans drive, of course.
  • A Sherlock Holmes mystery game, complete with a large sheet of paper giving various clues. Also apparently for DOS, and also never played. Why did I buy this stuff?
  • 5-1/4 inch (Yes) floppies for Appleworks, the Apple ][ spreadsheet/word processing/database software. There are even a pair of 3-1/2 inch floppies with it, and it runs on ProDOS, so apparently I bought it quite late in the game. I'm pretty sure my library database, circa 1990, is on another floppy somewhere.
  • Along with that, big floppies of Sargon II, the great chess program. I actually played this one. Not well.
  • And finally, a classic: 3-12 inch floppies for Borland Sidekick, the first great TSR (terminate and stay resident) program, and a great little calculator/calendar/whatever. You could pop it up, type in a note, go back to playing whatever text-based game you were playing, stop, type in another note, etc., all without going back the command line prompt. A great program for its time.

There are more nooks and crannies around here, if I find anything interesting tomorrow I'll let you know.

Sunday, January 29, 2012

Public Service Announcement

Have You Seen Me?

Saturday, January 28, 2012

Resize a Lot of Pictures

The church web site I run has a box the displays random pictures from our photo album. The formatting of the page is easiest if these pictures are no wider than 530 pixels and no higher than 340 pixels. Of course most pictures are taken with a camera these days are a couple of thousand pixels wide, so each picture needs to be resized. You can do that by hand, of course, but I found it easiest to write a script. If you're running Linux, this uses the ImageMagick package, particularly the identify and convert programs. On a Mac, it uses sips, which has been available at least since 10.3. I suppose it could be modified for Windows or run under Cygwin, but I don't use Windows enough to make it worth my time.

Save the file as websize, make it executable, and save it to a directory in your path. Then run it with the command

websize [list of image files]

This will take a file named, say, picture1.jpg, and create a new file named picture1_web.jpg that fits into the box defined by MAXWIDTH and MAXHEIGHT. If the picture already fits into the box it will duplicate the file.

#! /bin/bash

# Resizes a picture or pictures to make sure it fits into the UPB
# frontpage box of MAXWIDTH pixels wide by MAXHEIGHT pixels tall,
# keeping the same format (PNG, JPEG, BMP, etc.)

# usage

# websize [pictures]

# If a picture is named "picturename.ext", the shrunken picture
#  will be named "picturename_web.ext".

# If a picture already fits into the website, it will simply be
#  copied with its new name.  This makes it easier to find the
#  pictures that should be posted on the web.

# Define the maximum dimensions of the picture

let MAXWIDTH=530
let MAXHEIGHT=340

# For Linux machines we need "convert" from the ImageMagick package.
#  We'll assume it's in the standard location:

# For Macs the standard program is sips, at least since 10.3

if [ -f /usr/bin/sips ]
then
    OS="Mac"
elif [ -f /usr/bin/convert ]
then
    OS="Linux"
else
    echo "Cannot find a program to do the file conversion"
    exit 1
fi

for PICTURE
do

if [ "$OS" = "Linux" ]
then

#   identify is also part of the ImageMagick package

    let WIDTH=`identify $PICTURE | sed "s/x/ /" | awk '{print $3}'`
else
    let WIDTH=`sips -g pixelWidth $PICTURE | tail -1 | awk '{print $2}'`
fi

# Need new picture name:

HEADER=${PICTURE%.*}
EXT=${PICTURE##*.}
NEWPICT=${HEADER}_web.$EXT

echo Converting $PICTURE to $NEWPICT

# Is the picture too wide?

if (( $WIDTH > $MAXWIDTH ))
then
    if [ "$OS" = "Linux" ]
    then
 convert -resize ${MAXWIDTH}x $PICTURE $NEWPICT
    else
 sips --resampleWidth $MAXWIDTH $PICTURE --out $NEWPICT
    fi
else
    cp $PICTURE $NEWPICT
fi

# Note that the new picture may still be too large:

if [ "$OS" = "Linux" ]
then
    let HEIGHT=`identify $NEWPICT | sed "s/x/ /" | awk '{print $4}'`
else
    let HEIGHT=`sips -g pixelHeight $NEWPICT | tail -1 | awk '{print $2}'`
fi

if (( $HEIGHT > $MAXHEIGHT ))
then
#   echo Resizing height of $PICTURE

    if [ "$OS" = "Linux" ]
    then
 convert -resize x$MAXHEIGHT $NEWPICT 1_${NEWPICT}
    else
 sips --resampleHeight $MAXHEIGHT $NEWPICT --out 1_$NEWPICT
    fi

    mv 1_${NEWPICT} $NEWPICT

fi

done

The obvious modification is to allow MAXWIDTH and MAXHEIGHT to be read from the command line, maybe using -w and -h flags. That's for another day.

Saturday, January 07, 2012

Joining a Group

In an effort to make Ubuntu less scary to users (i.e., more Mac/Windows like), Ubuntu 11.10 removed some graphical system administration utilities that were previously available. One of those was a called Users and Groups, which let you see groups and make changes to group memberships.

The new Ubuntu would rather you just forget groups, so it includes no graphical tools for handling them. Fortunately it's still Linux, so you can fix it up yourself. Liberian Geek has details, but the first hint (using groupmod) didn't work for me, so here's my modified version. In this example, I want to add myself to the group vboxusers, which should allow me to get USB access for my Virtualbox installation. More on that some other time. For now, return with us to those thrilling days of yesteryear, before the GUI:

  1. Look at the file /etc/group. Specifically, we want to see who belongs to the group vboxusers:
    $ grep vboxusers /etc/group
    vboxusers:x:125:
    
    Nobody, as we expected.
  2. Now to follow the Geek and add myself:
    sudo usermod -a -G vboxusers rchawk
    
  3. Finally, confirm the addition
    $ grep vboxusers /etc/group
    vboxusers:x:125:rcjhawk
    

You'll need to log out and log back in before the system will recognize the new group setting.

Thursday, December 29, 2011

Installation Notes and Rants for Ubuntu 11.10

A few weeks ago I updated Hal to Ubuntu 11.10 (Oneiric Ocelot). This was relatively easy because Hal was already at 11.04, allowing me to do a distribution update from the update manager. Our other Linux box, harlie, was running Ubuntu 10.10, so that option wasn't available unless I updated first to 11.04 and then to 11.10. Instead, I downloaded 11.10 to a CD, and did an install more or less for scratch.

Now, mind you, the Ocelot has what are supposedly a lot of nifty features, including the not-quite-Mac-like-enough-to-be-sued (you might want to ask Google about that) Unity desktop interface. And, if you don't like Unity, you can get Gnome 3! I didn't really want any of that. What I wanted was a machine that had all the modern software but looked and acted exactly like the old Ubuntu. I didn't quite get that, but I came pretty close.

BUT: This release of Ubuntu sets computing back at least 10 years. In the effort to make everything super friendly, they have dumbed down the user interface so much that you MUST use the command line to make even the simplest changes: For example, up through 11.04 you could easily change theme colors through a GUI widget. This is an appropriate use of the GUI, you can see what the current colors are, select the colors you want, and if they aren't right you can fix them right then and there. But now, guess what? THE ONLY WAY TO CHANGE THEME COLORS IS TO EDIT A FRAKIN' TEXT FILE. AS THE SUPERUSER! (I only shout because I'm mad.) This is (pick one):

  • Dumb
  • Dumber
  • So stupidly idiotic that one expects that there must be a malevolent being doing this, someone who wants everyone to throw up their hands in exasperation and switch to OS X. Or worse, Windows 8.

And this kind of idiocy exists all over the place: Things that were easy to do before are now hidden. Usually you have to edit a text file that hasn't appreciably changed since 1999. OK, I can do that, but until last month I didn't have to. Hence my frustration.

The worst of it is, this isn't just Ubuntu, a lot of the changes are driven by Gnome 3. It's enough to drive one back to the ugliness that is FVWM, where at least you know you have to edit menus going in.

But not just yet. Click below to see how I overcame the obstacles, at least so far.

Saturday, December 03, 2011

Random Wallpaper Switcher for GNOME 3

20 October 2012: There's a revised version of this script. See what the changes are, then download the new version.

21 July 2013: And yet another revision, following my switch from Ubuntu to LMDE: a MATE version of this software.

Some things bore me — KU losing in March every year, the Yankees winning more than one pennant a decade, Republican Presidential Debates, etc..

One of my major points of boredom is a static background on my computer screen. Having the same picture up constantly just irks.

Apple solved this long ago, with Mac OS X you can pick a directory and have the pictures selected randomly from that directory. Linux has been a little slow to pick this up. A random wallpaper selector has never shipped with any window manager I'm aware of, leaving the field to third-parties and home-grown hacking.

Way back in the day I wrote setbg, a clunky Perl script which randomly changed the X11 background. That worked for window mangers such as FVWM, but it failed for GNOME, which has its own wallpaper protocol.

For GNOME 2 I used Scott Balneaves's Gnome background switcher, aka background.py, a Python script which let you specify a directory and a switching time. Every X seconds you got a new picture for wallpaper.

GNOME 3 does wallpaper a different way (Surprise!). Fortunately I stumbled on a one-liner which changes the background to a random picture. If you want to do it that way, you just enter

gsettings set org.gnome.desktop.background picture-uri file://$(find DIR -type f | shuf -n1`)

where DIR is the path to your picture directory.

OK, I can work with that. I decided to write a script, based on the one-liner, which combined the best features of setbg and background.py. What I want is a script that:

  1. Displays a random picture as wallpaper (see the gsettings one-liner, above).
  2. Changes pictures at random times. Say someplace between every 10 minutes and every 20 minutes, but not always every 10 minutes and not always every 20 minutes. setbg did this, but background.py did not. If I knew more Python I would have fixed that, but I never had time.
  3. Can be loaded as a Startup Application (now conveniently located in Applications/Other on your Ubuntu menu).
  4. Works on any Linux computer running GNOME 3. Basically requires a common scripting language. setbg used Perl, background.py Python. For kicks, I decided to do this one in bash.
  5. Only selects pictures to display. This was a little tricky. I don't know of a native GNOME command that says this is a picture or that is not a picture. I cheated on the previous requirement a bit and used the identify command from the ImageMagick package. No defense, except that it's available in every Linux distribution I know of.
  6. Shuts off when you log off, so that there aren't multiple copies running if you log back in. background.py did this. setbg relied on an FVWM command to explicitly kill it. I fudge this one a bit. Basically, my script checks every minute or so to see if its parent (usually gnome-session) is still running. If it's not, the script dies.

As I said, I wrote the script in bash. It's not really a long script, but it comes in at 173 lines because I commented everything. You can download my Gnome 3 Random Wallpaper Switcher script from my software page. It's not licensed, since it's all based on someone else's one-liner. But if you make changes to the script, or find a bug, please let me know about it.

To run the script, put it in your path and type

gnome3_random_wallpaper T1 T2 DIR

Where T1 and T2 are times in seconds, and you want the wallpaper to change at some time T where T1 < T < T2. DIR is the full path to a directory that contains pictures. If it contains some other files, that's OK, the script will skip over them. You and put the command in your startup applications.

I've only tried this with Ubuntu 11.10, as that's the only GNOME 3 desktop I have at the moment, but I don't see why it wouldn't work elsewhere.

Download the official RCJHawk Gnome 3 Random Wallpaper Switcher

Friday, November 25, 2011

I For One, Welcome Our New Canonical Overlords

I've just updated Hal to Ubuntu 11.10, Oneiric Ocelot.

I don't regret it — quite. It is however, going to take a long time to get it to where I want it to be, e.g., something that looks like my old Gnome 2 desktop.

Why not just change to a distribution that still uses Gnome 2? Because Gnome 2 is going away. openSUSE 12.1 is out now, and it uses Gnome 3. Fedora uses Gnome 3. You see where this is going.

So this post, and probably many more, will be rough notes on how to make Hal's desktop look like it did before. I'm not going to go cursing Mark Shuttleworth. (I've learned from the last ten years of cursing Dan Snyder — it just doesn't work.) Ubuntu is, for now, a useable distribution, and I can, eventually, tweak everything to get to where I want to go. That's the beauty of Linux.

Besides, it makes for a lot more blog posts.

Hal, I should point out, is just fine. He can still do fancy LAPW electronic structure calculations faster than the Cray XMP of my youth, and he still reads my email and browses the web with aplomb. He can still develop code with Emacs. He just doesn't look very good right now, but we're dealing with that.

Eventually I'm going to update the spouse's computer, Harlie. When I do that I hope to do one of those step-by-step guides, which will be more coherent. But for now, think of this as a set of Google Notebook entries. Oh, wait, Google pulled the plug on that and is now moving all my files to Google Docs.

Oh, well, let's just get on with it.

Oneiric comes with the brand-spanking new Unity desktop, which, as I said once before, is so like Mac OS X that it comes with a lawyer to deflect lawsuits from Cupertino.

I was wrong — it's worse than Mac OS.

Like OS X, Oneiric comes with a dock, or maybe it's called a Launcher. On the Mac the dock can be moved, it can change size, it can automatically hide if you don't want it on the screen, and it's quite easy to drag applications over to it. In Oneiric the dock is fixed on the left, you can't change its size, it only hides itself when a window pushes it away. You can drag applications onto the dock, but it seems harder, somehow, than on the Mac — that's my subjective point of view, of course.

So I quickly changed over to Gnome 3.2. Well, not quickly, because Gnome isn't installed in Oneiric. And since my 11.04 distribution used Gnome 2, the upgrade process ripped out all of that software as well. So one must install all things Gnome. I used to do this with Synaptic, but, guess what, Synaptic isn't installed either.

So first open up a terminal window. Can't find a terminal? Click on the Dash Home icon at the top of the dock, click More Apps, click to show all of the installed apps, scroll down and find the terminal, and click it. (First you might want to drag the icon over to the dock, for later use.)

With the terminal finally open, you can install Synaptic by typing

sudo apt-get install synaptic

You could then find synaptic in the Dash Home menu, but it's easier to just say:

sudo /usr/sbin/synaptic

and go from there.

Once in synaptic, search for Gnome and install it. You'll probably want to install some Gnome themes, etc. While you're there, also install the Gnome Tweak Tool as well.

Then log out. When the login screen appears, click on the little gear by your name and select Gnome Classic (no effects) or whatever other version of Gnome you desire.

It's OK to throw up your hands and go off to figure out Unity at this point. Really.

Because when you log in, you'll see something that looks only vaguely like your old Gnome desktop, sort of like the difference between Darrel Hammond and Bill Clinton. There's a menu on the top, but it only says Applications and Places. And the clock seems to be stuck to the middle of the upper panel, neither movable nor removable. Also the Theme will be hideous. You can fix that, sort of. Click Applications/Other/Advanced Settings, (that's the Gnome Tweak Tool), click Theme in the box that pops up, and play with the Window Theme and the GTK+ Theme until you get something you like. One of my missions is to figure out how to edit the theme colors, to create what used to be called a Custom Theme. No luck, so far, but if I find it I'll let you know.

You should have two toolbars, one at the top and one at the bottom of your window. You add things to these bars, change their properties, etc., as before, but instead of just right-clicking on the bar, you have to hold down the Alt key and right-click. That's easy enough.

You'll also have to search for some of your options. The old Gnome menu used to have a Preference section and an Administrative section. Those functions are now hidden in the Applications menu, under Other and System Settings, apparently with neither rhyme nor reason. Play around with that until you're comfortable in finding things.

Finally, for now, go to Things to Tweak After Installing Oneiric Ocelot 11.10, and see what's useful there. And don't forget 10 things to do after installing Ubuntu 11.10.

More as I find more stuff.

Saturday, September 10, 2011

Recording with PulseAudio

Sometimes I find that I want to record the sound coming out of Hal's speakers. Say that my automatic recording of Prairie Home Companion goes south because an earthquake/hurricane/remnants of a tropical storm knocked out my power. It would be nice to be able to go the Prairie Home web site, click on the archive for the show, play the streaming download and record it.

I've done this kind of thing for years, mostly without the earthquakes. Occasionally there have been problems, but it's always possible to find a solution. After which I write it down so that I'll remember how to fix things.

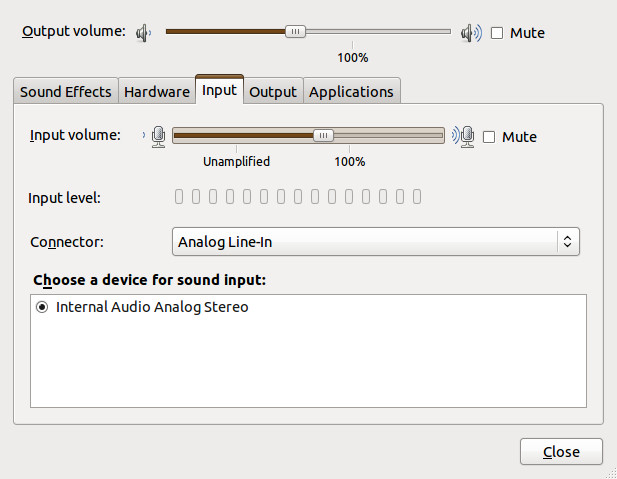
Except sometimes my notes aren't helpful, because somebody decided it was a good idea to change things. Take a look at the above link. To be able to record sound, I'm suppose to open Gnome's Sound preferences, click on Recording, and click on Capture. Let's look at gnome-volume-control as it's shipped with Ubuntu 11.04:

Gnome Sound Preferences

Looks nothing like what was described above, does it?

So what happened? Beats me. All I know is that someone changed things, and that the changes have something to do with PulseAudio, Ubuntu's choice for sound.

Fortunately, there is a Ubuntu Wiki article that solved things for me. Of course, the information you want is buried way down at the bottom of the article, so let me summarize it here, down at the bottom of this article. (Yes, I admit to being long-winded.)

First, you need to set up the PulseAudio volume control. For reasons known only to Mark Shuttleworth, this isn't installed by default in 11.04, and goes by the perfectly obvious name of pavucontrol. So install it first,

sudo apt-get install pavucontrol

and open it, either by typing pavucontrol from the command line or clicking "PulseAudio Volume Control" under Applications=>Sound & Video. You'll get something like this:

PulseAudio Volume Control (pavucontrol)

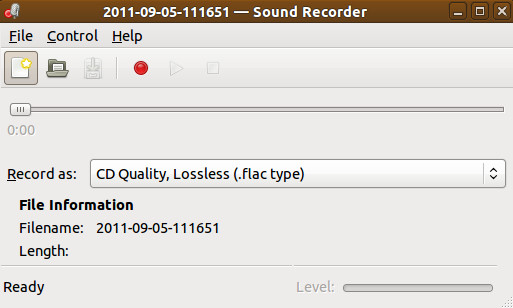
Not very helpful, is it? The problem is that there is no application open trying to record sound. So let's open up Gnome Sound Recorder:

Gnome Sound Recorder (with nothing recording)

Start something playing, and press Record. PulseAudio will now look something like this:

Pulse Audio Volume Control with Gnome Sound Recorder Operating

The key to making things work is the line that says:

Sound Recorder: Record Stream from: …

You may have several options, but what you want is Monitor of Internal Audio Analog Stereo. When this is selected Gnome Sound Recorder will record what's coming out of the speakers, and will look something like this:

Gnome Sound Recorder recording

You can see it is recording as the brown (surprise!) bar at the bottom moves in time with the music's volume.

We'll leave the rest of this, e.g., recording directly to .ogg or .mp3, converting from .flac to .ogg, using Audacity instead of Sound Recorder, etc., as an exercise for the reader. Just remember, to record sound with Ubuntu 11.04, you need to use Pulse Audio Volume Control to tell whichever application you are using to record to monitor the internal audio.

Until someone decides it's time for a change.

Sunday, August 14, 2011

Transparent PNG (or GIF) From the Command Line

Given the popularity of my post about making transparent PNG images with the Gimp, I should share a recent discovery: If you know the exact color you want to make transparent, you can do it from the command line.

What you need is the ImageMagick package, picture manipulation software that's available for all major Linux distributions, Windows, and Mac OS X (through MacPorts). If none of those work for you, you can also compile the source code.

Specifically, you need the convert command line tool. The syntax is:
convert -transparent color original_picture.png picture_with_transparent_background.png
and you can covert from png to gif, or visa versa, with the same command.

An example: here's the good ol' pengjay, with a horrid green (#00FF00) background:

Pengjay with green background

Since we know the background color is #00FF00, we can pipe it through convert:

convert -transparent #00FF00 pengjay_green.png pengjay_transparent.png

and we get this:

Pengjay with transparent background

Note that if you don't know the color, you're better off using the GIMP.

Saturday, August 06, 2011

Can I Go Home Now?

We've all been there. The home team drops seven runs in an early inning. By the seventh inning stretch they've shown no sign of an offense, and are still six runs down. It's hot, muggy, Washington night, there are thunderstorms brewing over the horizon, and your wife just phoned that she heard on WTOP that Rt. 50 to Annapolis was closing for repair work at 10 p.m.

Question: If I go home now, am I likely to miss anything? Aside from heat stroke and road rage?

Answer: Probably not. If the visiting team is ahead by six runs after the top of the seventh, historically the chance that the home team will pull out a victory is 1.6%, or about 60 to 1 against. Unless you're of the extreme optimist persuasion I'd suggest going home.

I got to thinking about this a few years ago, when Bill James published an article in Slate on when a college basketball game is really over. Based on his observations, he was able to come up with an algorithm which predicts when a team has a safe lead, based on the lead, time left in the game, and who has the ball.

In baseball we can do the same kind of thing, except that there are only a finite number of logical stopping points (the end of a half-inning) and leads (the largest of which was less than 30 runs). Plus, we have a line score for just about every major league baseball game played since 1900, so we have a lot of data. This means that we don't need no stinkin' algorithm, we can give you the history probability that any given lead was overcome.

I didn't go all the way back to 1900. I stopped at 1948, because that was the data that was available using Retrosheet's Play-by-Play Files. With the Chadwick Software Tools we can go through all the games in the database and see how many times that, say, the visiting team was ahead by five runs after then end of the first, and how often the home won in that situation. Do that for all possible combinations of leads and innings and we get the table below. (You may have to widen your browser window to see everything.)

Visitors Lead Tie Home Lead
Inn. 10+ 9 8 7 6 5 4 3 2 1 0 1 2 3 4 5 6 7 8 9 10+
T 1 .077 .000 .040 .041 .083 .157 .187 .304 .378 .486 .591                    
B 1 .000 .000 .063 .056 .055 .132 .148 .236 .313 .416 .533 .643 .740 .819 .893 .912 .933 .960 1.00 .944 1.00
T 2 .000 .027 .067 .057 .080 .169 .180 .262 .345 .452 .580 .692 .781 .846 .925 .929 .969 .974 1.00 .941 1.00
B 2 .000 .016 .043 .032 .055 .134 .127 .218 .295 .397 .532 .656 .756 .829 .895 .920 .956 .966 .957 .976 1.00
T 3 .034 .032 .019 .043 .075 .133 .166 .250 .339 .456 .582 .705 .801 .863 .927 .939 .972 .984 .980 1.00 1.00
B 3 .015 .024 .016 .031 .047 .095 .122 .200 .278 .394 .526 .655 .766 .840 .909 .930 .958 .977 .986 .989 .990
T 4 .012 .021 .028 .033 .071 .096 .145 .225 .314 .446 .589 .719 .820 .886 .933 .963 .971 .988 .990 .994 .988
B 4 .004 .011 .022 .028 .039 .062 .094 .164 .252 .369 .526 .677 .788 .866 .917 .949 .969 .986 .990 .992 .996
T 5 .004 .009 .020 .031 .045 .078 .114 .199 .290 .422 .591 .741 .843 .904 .945 .967 .982 .995 .995 .991 1.00
B 5 .002 .005 .009 .019 .026 .049 .077 .139 .224 .344 .523 .692 .808 .887 .936 .962 .981 .989 .995 .993 .999
T 6 .001 .005 .011 .019 .031 .055 .091 .161 .268 .406 .600 .771 .873 .931 .964 .975 .994 .995 .999 .998 .998
B 6 .001 .000 .005 .009 .014 .030 .049 .097 .185 .305 .520 .725 .848 .917 .956 .972 .989 .994 .998 .999 .998
T 7 .001 .001 .004 .010 .016 .038 .061 .118 .217 .357 .610 .819 .912 .958 .977 .991 .995 .998 .999 1.00 .999
B 7 .000 .002 .002 .002 .007 .015 .033 .059 .130 .245 .523 .772 .894 .949 .973 .990 .995 .998 .999 .999 .999
T 8 .000 .001 .003 .004 .007 .017 .041 .074 .153 .296 .634 .890 .956 .985 .992 .997 .999 1.00 .999 1.00 1.00
B 8 .000 .000 .000 .001 .002 .006 .013 .027 .067 .150 .519 .865 .944 .981 .990 .997 .999 1.00 .999 1.00 1.00
T 9+ .000 .000 .000 .002 .003 .007 .014 .033 .071 .157 .615 1.00 1.00 1.00 1.00 1.00 1.00 1.00 1.00 1.00 1.00
B 9+ .000 .000 .000 .000 .000 .000 .000 .000 .000 .000 .524 1.00 1.00 1.00 1.00            

So what is all of this?

  • The left hand column represents the situation at the end of either the top (visitor's) half of an inning, or the bottom (home team's) half, so T 7 describes the situation just before the Cubs let that day's designated karaoke singer ruin Take Me Out to the Ballgame. Since all innings after the ninth are played under the same conditions — the team ahead after the bottom of the inning wins, and if it's tied we try, try again — I combined all the data from those games into the labels T 9+ and B 9+.
  • The other columns represent the lead by either the home team (on the right) or the visiting team (left) at the end of the half-inning. Ties are right in the middle.
  • The decimal fraction in each block indicates the home team's chance of winning in that situation. So, for example, if you've just sat through an agonizing top of the third, when Yankees have scored a bunch of runs and lead by 7, we look at row T 3, column Visitors 7, and see that the Orioles have a 0.043 (4.3%) chance of winning the game — no, that's not true. Over the course of the last 60 years, 4.3% of all major league home teams down by 7 going in to the bottom of the third have come back to win. These are the Orioles, however, so they have about a 0.001% chance of coming back.
  • I put all leads of ten or more runs in the 10 + categories. The software I wrote to write the table is easy to modify to list bigger leads, if you like.. I stopped at 10 because that will more or less fit on a standard blog page.
  • The blank spaces are impossible situations. The home team can't score before it gets up to bat, so the right-hand side of the T 1 row can never be reached. And the home team doesn't need the bottom of the ninth or later inning unless it was tied or behind after the top of the inning. In that case they can never win the game by more than four runs.
  • Indeed, I debated about putting in the B 9+ column, since it's a trivial case, but I wanted to highlight the fact that the home team still has a big advantage if the score is tied in late or extra innings. I've discussed this elsewhere.
  • Finally, I haven't told you about the statistical significance of these results, i.e, the standard deviation or the sample size. Suffice it to say that there are more than enough events here for leads of nine runs or less. When we get to the 10+ category, especially in the early innings, there just aren't that many games. If you want to see the raw numbers (home wins/visitor wins/total games) drop me a line and I'll send them to you.
  • Really last finally: I made a slight modification to the Chadwick source code to make it easier to parse the runs scored per inning. I also wrote a Perl script and some Fortran code to parse the output from Chadwick and write the HTML for the table above. If you're interested in the codes, drop me a line. If there's enough interest I'll make all the code available on my website.

Sunday, July 31, 2011

Almost Spot On

I'm currently listening to The Essential Kansas, the 70's boy band (I jest) from Topeka. For some reason, I've never bought a Kansas album, and I don't plan to in the near future. Yet I'm listening completely legally, and not paying a dime.

That's because Spotify has finally made it from Europe to the U.S. I read about it in a New York Times article (I just access the free stuff there, too) the other day and decided to try it out. As far as I can tell, the deal is:

  • With a free-as-in-beer account, you can stream any song in Spotify's vast library (and it's vast, if somewhat uneven).
  • For now, you can listen to an unlimited amount of music, only interrupted by two minutes of commercials any hour.
  • After six months, your free account is limited to ten hours of music per month. I read that in the NYT article, good luck in finding it in Spotify's account description.
  • Of course, there are other plans that let you stream unlimited amounts of music, without ads, for a price.
  • You have to use Spotify's music player.

That last part was almost a deal breaker. (Can you break a free deal?) There is no generally available Linux client. There is an alpha version of a Linux player, but it doesn't seem to have been worked on for a year or so, and it can only be used with the paid accounts, because we haven't found a reliable way to display ads yet.

However, the Windows client runs under Wine, and Spotify gives detailed instructions on how to get it started. You can't play your local MP3 files through Spotify (not sure I'd want to), but the stuff that comes over the web sounds good — according to the NYT article, it's in 160-kbps Ogg Vorbis format.

All right, how is it? Funny you should ask.

The sound quality is good enough for my speakers-in-the-monitor setup. Beyond that I couldn't say. Audio purists will probably find some fault, but the real purists are listening to vinyl anyway. The playlist is extensive, but not complete. OK, I didn't expect the Beatles here, but the Eagles are mostly missing. You do get what seems to be complete coverage of the Rolling Stones, Simon & Garfunkel, Creedence Clearwater Revival, Bob Marley, Peter, Paul & Mary, the Mommas and the Papas, the aforementioned Kansas, Roger Miller, Glen Campbell, Johnny Cash, a limited amount of Dylan, and even Hugh Laurie reading Three Men in a Boat. They have what seems to be the complete Jimmie Rodgers the Elder, but I can't find anybody's version of Jimmie Rodgers the Younger's classic ballad It's Over. This would frustrate me if I was actually paying for this stuff, but since it's all free I really can't complain. It seems as though they're working on it.

Oh yes, one more thing: if you want to sign up for the free account, you need an invite. Apparently paid-for account holders can give you an invite, or you can go to Spotify.com and ask for one. It took about thirty seconds for me to get an email after I asked, but YMMV.

All in all, it seems to be a pretty good service, at least for now. If you put a map of the continental U.S. on a dartboard so that Kansas is the bull's eye, Spotify's dart hits at about Oklahoma City. Add the Eagles, more Dylan, and the Beatles (Ha!), and they can hit Holyrood.